

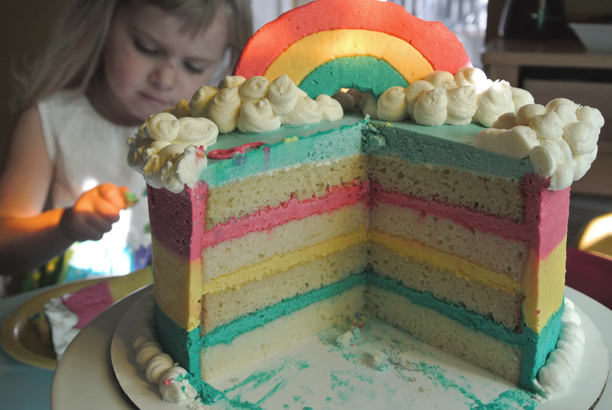
This rainbow cake was made for my 4 year old daughter’s birthday party, but it could easily be used for a unicorn themed party. A printable buttercream cake topper template and gluten free cake batter recipe is included.
Please read all the instructions carefully before starting your cake. The tutorial is first, followed by important tips and recipes.
– – – – – – – – – – – – – – – – – – – – – – – – – – –
TUTORIAL
What you’ll need:
- Four cooled, leveled 8″ round cake layers
~About one hour cook and prep time each, recipe below - 2.5 cups each pink, yellow and blue buttercream frosting
2 cups sky blue frosting
2.5 cups white frosting
~ Making all the frosting at once takes 1 hour, recipe below, there will be extra frosting when the cake is complete - Small offset spatula
- Three #1A circle tips and piping bags, or a ziplock bag with 3/8″ opening cut out of a bottom corner
- One #12 circle tip and piping bag, or a ziplock bag with 1/8″ opening cut out of a bottom corner
- Cake edge scraper
- 10″ cake round
- Spinning cake table
- Wax paper
- Rainbow cake topper template (click here for printable)
– – – – – – – – – –
Assembly:
If you’ve never assembled a layer cake before, I highly recommend watching this video tutorial first: https://youtu.be/LpHTmgXFJKM
- Perfectly center the first cake layer onto the round, then center the cake round onto a spinning cake table.
- Pipe blue frosting on top of the first cake layer and smooth it with a spatula. It should be about 1/4″ thick. It’s OK if a little of the frosting sticks out from the edge. Add the second cake layer, making sure it’s perfectly aligned with the first. Pipe yellow icing on top, smooth, then repeat for the third cake layer using the pink icing.
- Add the fourth cake layer, then begin the crumb coat: smooth any colored frosting that is sticking out of the sides and fill in the remaining gaps using the blue, yellow and pink frosting. You will only need to pipe a little dollop of each onto the cake to create the crumb coat, which should only be 1 mm thick. It’s OK if the colors touch at this point, just as long as they don’t meet where the layers meet. The goal is to have the outside cake colors match up with the inner colors. It won’t matter which color you use for the top of the cake at this point. Place the cake in the refrigerator for 30 minutes to chill the crumb coat.
- In the meantime, create your rainbow. Print THIS TEMPLATE on letter sized paper with no scaling (once printed, the rainbow should be 5″ wide), then tape the template onto a small cookie sheet with wax paper taped on top. Following the template, pipe colored frosting onto the wax paper to make your rainbow using the #1A tips. Using the offset spatula, gently smooth the rainbow. The side that is visible now will be the back of the rainbow when the cake is assembled. Smoothing the back makes the rainbow colors stick together better, which is important when the topper is transferred from the wax paper to the cake. Place the topper in the refrigerator for 30 minutes.
- When the crumb coat is ready, center the cake back onto the spinning table. Go heavy piping the frosting onto the edges, taking care to cover the layer frosting with each corresponding color.
- Using a cake edge scraper, lightly remove a thin layer of frosting while spinning the cake table. Continue to lightly remove frosting until the colors are completely touching each other and the cake edges are completely smooth. Take your time on this step – unlike a solid-colored cake, there is no easy way to add frosting back if you swipe off too much.
- Fill in the top of the cake with sky blue frosting. The sky blue and pink can touch, but don’t try to blend the two colors together or create a perfect edge, it’s about to be covered up with clouds.
- Clean up the bottom of the cake round if necessary using a damp paper towel, then bead white “clouds” along the bottom of the cake where it meets the round. Once that is finished, bead more clouds along the top of the cake to cover up the edge where the pink and sky blue meet.
- Pipe larger clouds onto the top of the cake and where you plan to place your rainbow topper. Gently remove the chilled, still-cold cake topper from the wax paper and insert it into the clouds. Add more clouds if desired and any additional decorations, like birthday messages, small figurines and candles.
– – – – – – – – – – – – – – – – – – – – – – – – – – –
HELPFUL TIPS
Watch this video if you’ve never assembled a layer cake before: https://youtu.be/LpHTmgXFJKM
Prepare your cake ahead of time
Break the cake preparation up into several evenings ahead of your event. Preparing the different elements of the cake (layers, frosting…) takes several hours total. The cake layers and frosting can be frozen, they just need to be left out for several hours or overnight to become room temperature.
Food coloring: In all my blog posts, I strive to stick within the boundaries of my son’s ADHD natural treatment diet. Artificial food coloring is believed to trigger symptoms according to the Feingold diet. Over 3 years of administering a natural treatment diet, I have found that the occasional artificially-colored treat is OK as long as the atmosphere is relaxed (example: on the weekend at home as opposed to at school). Since I planned to serve this cake on the weekend at home, I used the Wilton Color Right system. If you want to stick with natural food coloring, Color Kitchen Foods provide nice food coloring powders. They are a little more on the pastel side, but would still make a nice cake.
– – – – – – – – – – – – – – – – – – – – – – – – – – –
8″ CAKE ROUND RECIPE FOR GLUTEN FREE
Read all directions first, ingredients are listed as they are used with instructions following
Preheat oven to 350 degrees. Oil and flour two 8″ cake pans. In a stand mixer bowl with paddle attachment, add:
- 3 cups g-free baking mix (Bisquick equivalent)
- 2 cups granulated sugar
- 1 package xanthum gum
- 1-1/2 tsps salt
- 2 Tbsps baking powder
Blend, then add:
- 3/4 cups softened butter
Blend well until entire dry mixture looks like tiny crumbs, then add:
- 1-1/2 cups milk
- 1-1/2 tsps vanilla extract
Mix well, then add:
- 3 eggs
Mix well for a few minutes. Divide batter into two 8″ round cake pans. Cook 40 minutes each.
– – – – – – – – – – – – – – – – – – – – – – – – – – –
PERFECT BUTTERCREAM FROSTING DOUBLE BATCH
Read all directions first, ingredients are listed as they are used with instructions following
In a stand mixer bowl with whisk attachment, add:
- 2 cups (4 sticks) softened butter
Beat 5 minutes on highest speed, then add:
- 8 loose (not packed) cups powdered sugar, one cup at a time on low/medium speed
Beat 7 minutes on high speed, then add:
- 2 tsps vanilla
- 1-3 Tbsps whipping cream, or more as needed to achieve desired consistency
Beat until blended. Makes about 7 cups of frosting.

